I’ve been making my own kombucha for years now and it has been a really fun, rewarding and delicious experience! Kombucha is a healthy, probiotic rich beverage that is very affordable when you make your own. It may seem overwhelming at first but it’s actually quite easy once you get the hang of it.
You will need:
– A brewing vessel. A gallon glass jar works great. Avoid ceramic, crystal or metal.
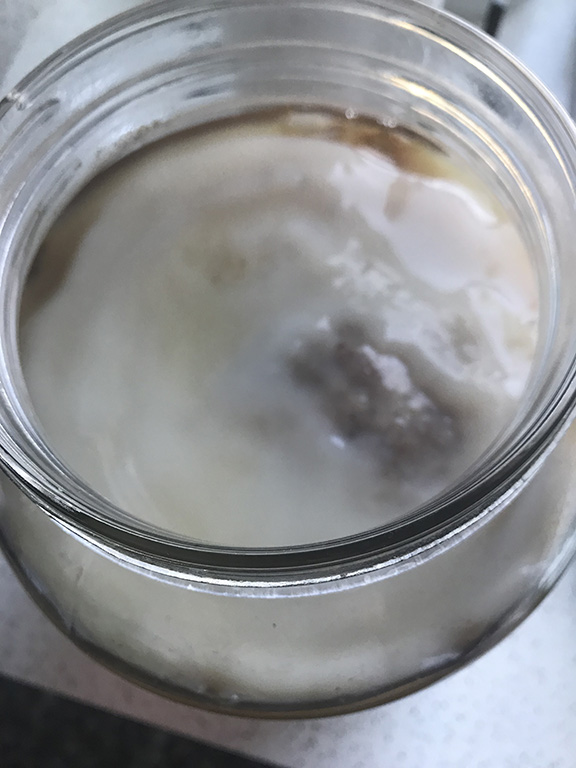
– A SCOBY, which stands for Symbiotic Culture of Bacteria and Yeast. For a gallon of kombucha you need a 4-5 ounce SCOBY, which is approximately 6 inches across and 1/4-1/2 an inch thick. There are ways to grow your own SCOBY within its own starter liquid by using store bought unflavored kombucha but unfortunately this is unreliable so I recommend purchasing a SCOBY (which comes in liquid) for best results. There are a number of online retailers such as Kombucha Kamp and Cultures for Health or if you know someone already making kombucha, ask for one of their SCOBY babies. SCOBYs reproduce with every batch, growing a thin white SCOBY on top, with the older SCOBY below growing dark due to contact over time with the dark black tea
– 1-2 cups starter liquid. This is some of your already-made-kombucha or the liquid that comes with your SCOBY. If using liquid from a batch of your own kombucha, aim to use the liquid on the top so as to not get too much yeast which tends to live on the bottom of the vessel.
– One gallon of water. Spring water is best. Chlorine in tap water could kill your SCOBY.
– 1-2 tablespoons of loose black tea
– One cup of cane sugar. Don’t use raw honey or artificial sweeteners. Don’t be alarmed by this amount of sugar as the SCOBY will live off this sugar and therefore the final product will be fairly low in sugar compared to the cup you start out with.
– A wooden spoon for stirring in the sugar and tea and a pot to boil the water in. I’ve heard that no metal should touch the SCOBY but coming in contact with metal briefly on occasion isn’t a problem.
– A cover for your vessel and a rubber band to secure it. Don’t use cheesecloth as bugs can still get in. Paper towel or a coffee filter will work great.
How to brew your own kombucha:
Bring one gallon of water to just-off boiling and then add one cup of sugar and the black tea. Stir and steep for ten minutes before straining into your gallon jar brewing vessel. I fill the jar about 3/4 full (and my husband loves drinking the leftover 1/4 gallon of sweet tea) to allow room for the starter liquid and SCOBY to be added once the strong sweet tea is cool enough to stick your (clean!) finger into. Pour the starter liquid in last, over the SCOBY, as this is said to provide a final barrier to reduce the chance of pathogens getting in. Cover with a paper towel using a rubber band and let this ferment away from direct sunlight for about a week. Ideally keep it in a warm (70-80 degrees is ideal) spot with good airflow and away from any other cultured foods as cross contamination from kefir, sauerkraut, etc may prove problematic for your kombucha SCOBY, or vice versa.
The longer you let it ferment the less sugar will be present and the more vinegary the taste. Test by inserting a straw under the SCOBY and drawing out some of the liquid. When ready, you can drink it immediately or pour it into bottles that you seal and allow to ferment further which will increase the fizz, which for me is what kombucha is all about! Flat kombucha? No thanks!
The best way to get a delightful effervescent kombucha is to do a second fermentation when you bottle it. Take four cups of water and bring it to just off-boiling in a pot. Add seven teaspoons cane sugar and two to four tablespoons herbal tea. I love using lemon balm, lavender, roses or stinging nettles. Steep ten minutes, strain and divide this sweet herbal tea between about five large flip-top bottles. You can also bottle into a large carboy, which is simple and works well but will go flat fairly quickly once opened so is only good if you’ll be drinking the whole batch within a couple days (which I don’t recommend unless you are sharing it!). Note that if you do end up with some flat kombucha, it makes great popsicles! Once the second ferment tea has cooled in the bottles, fill the bottles, leaving an inch or two of space, with your kombucha brew (making sure to reserve aside your SCOBY and one to two cups starter liquid to make your next batch). These bottles can ferment for about five days before placing in the fridge.
It’s important to understand that you need to use black tea for making your kombucha brew with the starter liquid and SCOBY in order to keep it at the proper pH balance. Herbal tea can only be used for the second fermentation step when you’re bottling your brew. This addition of sweet herbal tea at bottling will give the good bacteria in your kombucha some new sugar to munch on and result in each bottle producing its own baby SCOBY which is why I always strain my bottles through a sieve before drinking. SCOBYs are certainly edible but it’s not a pleasant surprise to get an unexpected mouthful! I recommend opening your kombucha bottles over the sink as I’ve had some geysers, like kids’ volcano experiments.
After you bottle your kombucha, you’ll start the whole process again: making a gallon of strong black sweet tea (you’ll only use 3/4 of this since you need to leave room in your vessel for your starter liquid and SCOBY), allow to cool and then add your SCOBY and starter liquid to start the whole process over again. It’s great to get in a routine of doing this whole process about once a week but it’s okay to wait longer and you may need to wait two or three weeks even during winter when the colder temperatures make for slower fermentation.
If you want to do a continuous brew method, this is explained will by Wellness Mama. The continuous brew method uses a vessel that has a spigot so you can get delicious kombucha without disturbing the SCOBY. You can either add sweet tea as you go (i.e. for every cup of kombucha you drink, add one cup of sweet tea) or pour out about 50% ( approximately one gallon) and then (assuming you are using the most common continuous brew 2.5 gallon container) pour in another gallon of sweet tea. The Big Book of Kombucha advices only taking about 1/3 (about 3/4 gallon for the most common continuous brew vessel) for the first three to five cycles in order to really build up “sour pour”, as they say. This will give you a nice strong kombucha to do the work on the next batch. After that, you can take about 50% (always leave starter liquid in the vessel for your next batch , i.e. then you only need to add sweet tea). The Big Book of Kombucha recommends letting the original continuous brew batch ferment for 10-28 days. After that, it may be ready in as little as a few days (since it has so much starter liquid to help it along).
The kombucha SCOBY will grow! Even if the SCOBY sinks, the new SCOBY will grow across the top of the liquid, forming a seal. It will grow so much that eventually you’ll need to separate some off so that it doesn’t overwhelm your brewing vessel. I just use my hands to gently pull it apart. You can create what is known as a SCOBY hotel by storing your extra SCOBYS in some starter liquid. You can use these to make additional batches or give away. My original SCOBY, Norman, was shared with numerous friends.
You don’t need to worry if your SCOBY gets discolored because it will! The older SCOBY will get dark due to contact with the black tea and it should only be tossed if it gets fuzzy mold. SCOBYs are very resilient! If you want to take a break from making kombucha, just make sure your SCOBY has enough liquid to feed off of as the most likely reason for having to toss your SCOBY will be if it runs out of liquid and eventually molds. If you do take a break from brewing, know that it might take a couple batches before your SCOBY is fermenting to its full potential!
Happy brewing!